You can customize the BrainHi calendar in two ways: by giving each service and each provider a color, and by letting your team book appointments outside office hours. This guide is for office staff who manage the settings.
Part 1: Colors by service and by provider
What is it for?
Color helps you recognize at a glance which service or which provider each appointment has, without reading the name.
If you don't see the Color field in your settings, your account doesn't have the new calendar yet. Contact support.
Step 1: Open Settings
In the menu, click Settings.
Step 2: Find the service or the provider
Where it is depends on what your office's Settings menu looks like:
- If you see the Appointment Coordination section:
- For a service: click Appointment Coordination and, under Services and visit reasons, choose the service.
- For a provider: click Providers and choose the provider. The Color field is below Provider identity.
- If you see the Services and Providers sections: click Services or Providers and choose the service or the provider from the list.
Step 3: Choose the color
In the Color field, click one of the 12 colors: Orange, Sky blue, Green, Yellow, Blue, Pink, Red, Purple, Brown, Lime, Gray or Black. If you hover over a color, you will see its name.
- To see more shades, click More colors.
- To remove the color, click No color.
The color saves right away, there is nothing else to do. Several services or several providers can use the same color.
If you are creating a new provider, save it first. Until then you will see the message Save this provider first to be able to choose its color.
Step 4: See the colors on the calendar
In the menu, click Appointments. The color appears as a dot next to the service or provider name in these places:
- Day view: each service or provider column has a colored line across the top and the dot next to its name. Use Service or Provider, in the left panel, to choose how the columns are organized.
- On each appointment: next to the service or provider name shown on the appointment card.
- In the appointment summary.
- List view: next to each appointment's provider and service.
- Left panel filters: next to each name under Providers and Services.
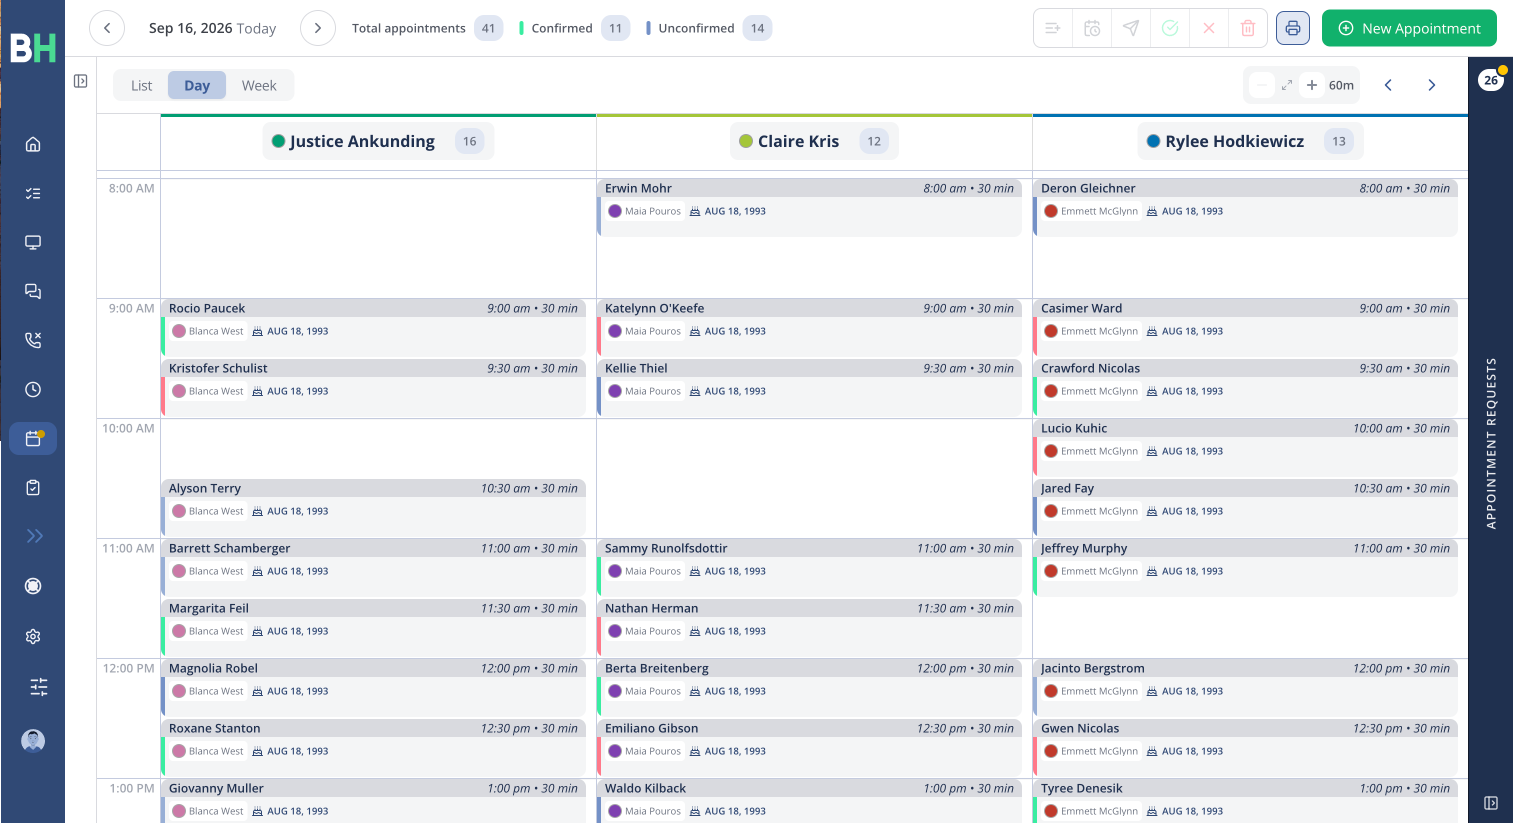
The appointment status color does not change. The bar on the side of each appointment keeps showing its status as always.
If your office has an integrated calendar
If your office uses an integrated calendar, you will see this note below the colors: This color is only used in BrainHi. It is not sent to your integrated calendar.
Part 2: Allow booking outside office hours
What is it for?
Some days you need to give a patient an appointment outside your regular hours. With this option on, your team can choose those times when creating or editing an appointment from the calendar.
This option is off by default. You will find it in the Appointment Coordination section of Settings. If your office doesn't have that section, contact support.
Step 1: Turn on the option
- In the menu, click Settings.
- Click Appointment Coordination.
- Under Calendar Settings, turn on Allow booking outside office hours.
Step 2: Book an after-hours appointment
Open the appointment modal from the calendar and click the Time field. First you will see the office hours, as usual. Below them you will see the Outside regular hours group with the rest of the times of the day.
If you choose a time from that group, the modal shows the note This time is outside regular hours.
Good to know
- It only applies to office staff. Your patients' scheduling link keeps offering only your office hours.
- Staff availability rules still apply, whether the option is on or off.
- If you turn the option off, the Time field goes back to offering only the office hours and the services' windows.