BrainHi has filters on two screens: Conversations and Appointment Requests. This guide is for office staff and explains how to use each one.
What are they for?
Filters help you see only what you need to handle. For example, conversations that have an unresolved task, or requests from new patients that came in through citas.pr.
Part 1: Filters in Conversations
Step 1: Open the filters panel
In the menu, click Conversations. To the right of the Search bar, click the funnel icon (Filters). The filters panel opens.
Step 2: Choose your filters
You can check options in several groups at once:
- Response Tag: shows the tags your conversations have, with the number of conversations for each one in parentheses. If no conversation has a tag, this group does not appear.
- The conversation contains: choose the type of event the conversation has, for example Form, Appointment request, Task or Appointment confirmation. You only see the types your account uses. If you check Appointment request or Task, the Only unresolved option appears below it so you can see only the ones still pending.
- Assigned to: shows the conversations assigned to the people you check. Only admin users see this group.
- Date: choose a date in From, in To or in both to see conversations by the date of their last message.
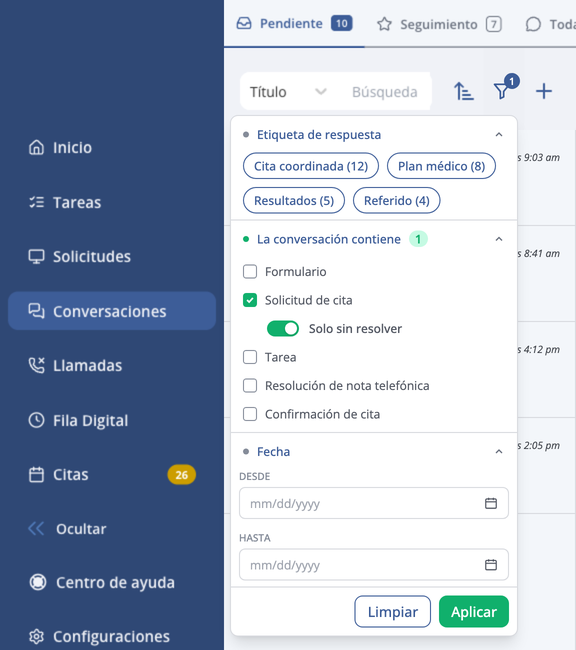
Step 3: Click Apply
The filters don't change the list until you click Apply. If you close the panel by clicking outside it, any changes you didn't apply are lost.
When filters are active, the funnel icon shows a number with how many filters you are using.
Step 4: Remove the filters
Open the panel and click Clear to remove all filters at once.
Good to know
- Filters combine with the tab and the search. The result respects the conversations tab you have open and whatever you typed in Search.
- You can share the link. The filters are saved in the page address (URL). If you copy the link and send it to a teammate, they will see the list with the same filters.
Part 2: Filters in Appointment Requests
Step 1: Open Appointment Requests
In the menu, click Scheduling. The Appointment Requests screen opens, with three tabs: Pending, In Progress and Archived. Each tab shows how many requests it has.
Step 2: Search for a patient
Next to the tabs is the Name or phone search box. Type at least three letters of the patient's name or three digits of their phone, for example Rivera or 787. The list updates on its own.
Step 3: Use the Filters panel
To the left of the list is the Filters panel. Each option you check applies right away, there is no button to click. These are the groups:
- Source: citas.pr shows the requests the patient made from citas.pr. Regular shows the ones that came in other ways, such as your scheduling link, a missed call or a text message.
- Patient type: New or Existing.
- Request date: choose a date in From, in To or in both to see the requests that came in during that period.
- Visit reason: appears only on accounts that schedule by visit reason.
- Desired service: the service the patient asked for.
- Insurance: the patient's medical plan.
- Preferred doctor: the doctor the patient chose.
- Documents: turn on With attached documents to see only the requests that include documents.
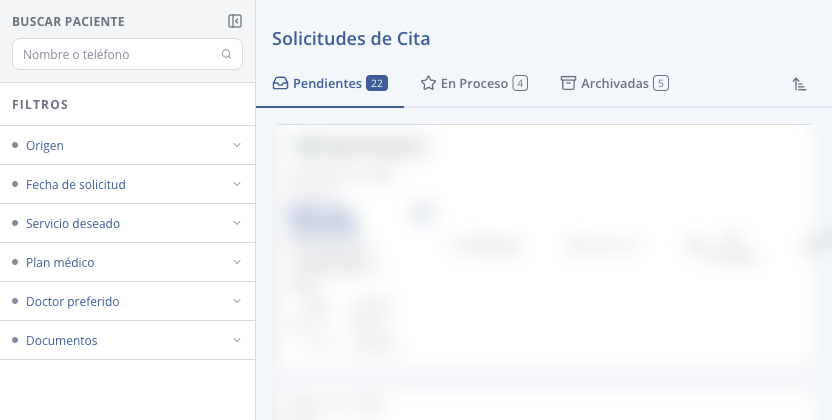
The number on each tab changes to show how many requests match your filters. If none match, you will see the message No requests match.
Step 4: Remove the filters
When you have filters or a search active, Clear filters appears next to the Filters title. Click it to remove all of them at once, including the search.
Step 5: Hide or show the panel
For more room, click the close panel icon next to Filters. The panel turns into a thin bar on the left that says Filters and shows how many filters are active. Click that bar to open the panel again.
Good to know
- BrainHi remembers your filters. The next time you open Appointment Requests from the same browser, you will see the same filters and the panel open or closed the way you left it.